How to Create an Email Group in Outlook (Step-by-Step, All Versions)
- 0
- 208
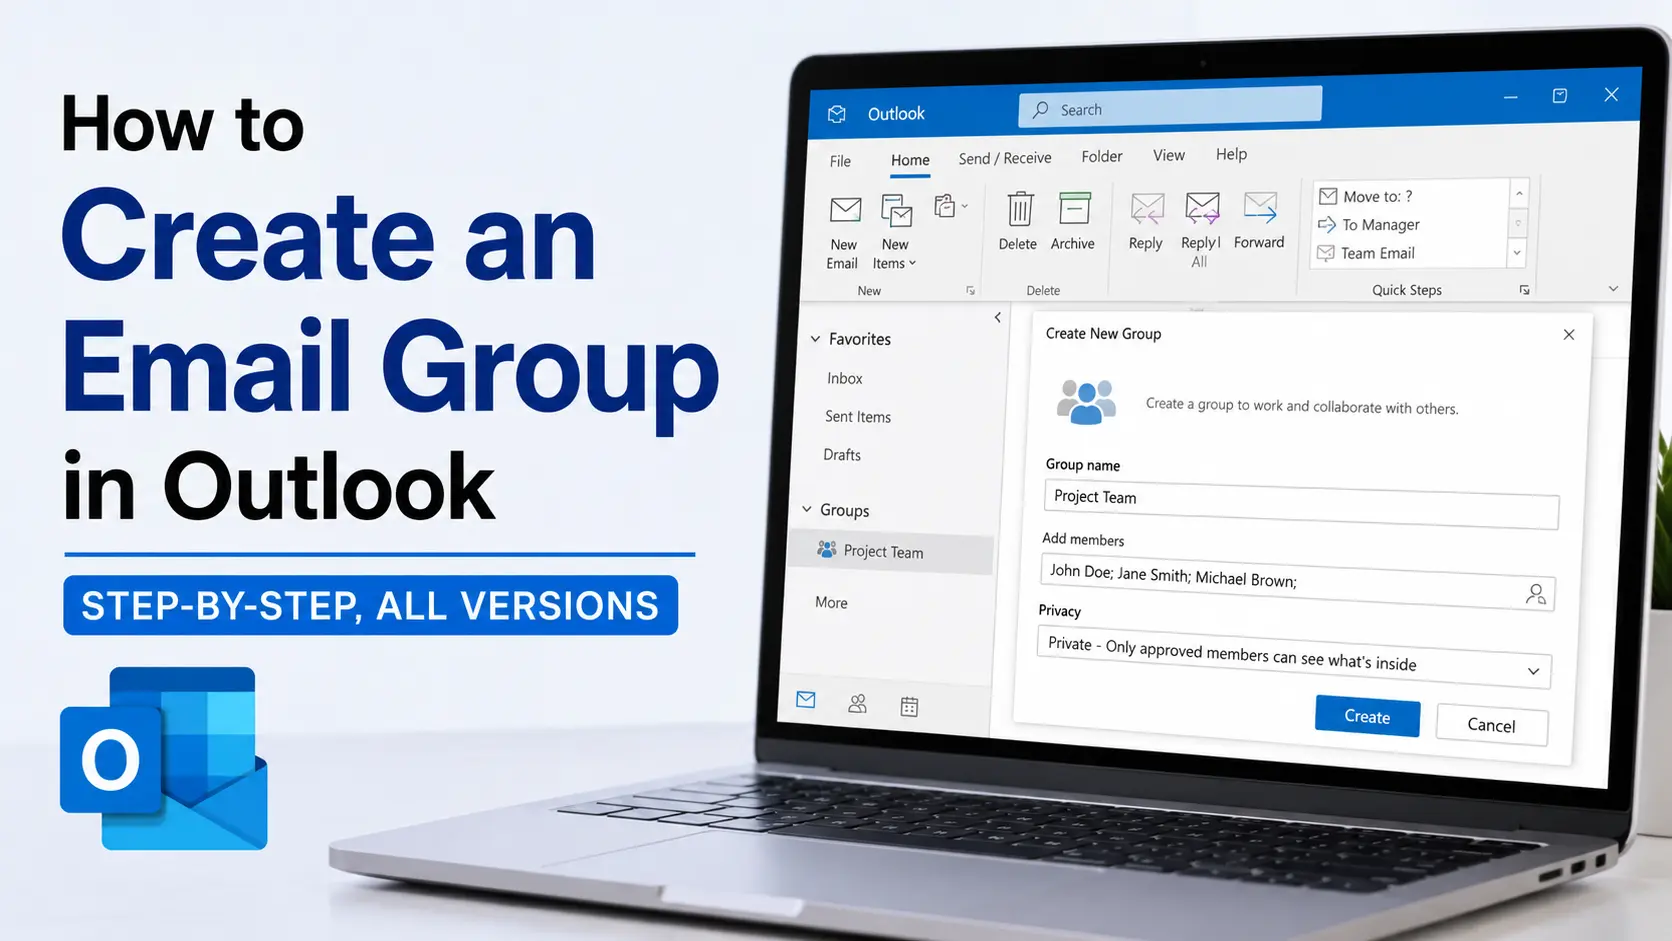
To create an email group in Outlook, open People (bottom-left of the Outlook window), then click New Contact Group in classic Outlook or New contact list in new Outlook and Outlook on the web. Give it a name, add members from your contacts or address book, and save. Once it's saved, typing the group name into the To field of any new email will auto-fill every member's address.
That's the two-minute version. But if you've ever had a group "disappear" for a colleague, or wondered why your list won't work as a company-wide broadcast, the naming and the version you're running matter more than the steps themselves. Here's the full picture, including the parts most tutorials skip.
Contact Group, Contact List, or Distribution List? Outlook's Naming Is Genuinely Confusing
Before you build anything, it helps to know that Outlook doesn't use one consistent name for "a bunch of email addresses saved under one name." <cite index="8-1">In new Outlook, what was called a "Contact Group" in classic Outlook is now called a "Contact List."</cite> Same feature, different label depending on which app you're staring at.
Here's how the terms actually break down:
- Contact Group (classic Outlook for Windows) and Contact List (new Outlook, Outlook on the web, Outlook for Mac) are the same thing: a personal, self-managed list of addresses that lives in your own Contacts folder. <cite index="8-1">It's not shared with anyone else and doesn't appear in the company directory.</cite>
- Distribution list is the informal name most people use in conversation for the same feature — it's not a distinct Outlook object, just a common way to describe it.
- Microsoft 365 Group is a completely different, heavier-weight tool. <cite index="3-1">It comes with a shared inbox, calendar, and files, and requires a qualifying Microsoft 365 work or school account.</cite> If you just want to email the same 12 people without retyping addresses, you don't need this — it's overkill and adds admin overhead you probably don't want.
One thing worth knowing early: a personal contact list is genuinely personal. If you send someone a contact list by forwarding it, or if a teammate builds "Marketing Team" on their machine, that group only exists for them — it won't appear in your Contacts or the shared directory. For an org-wide list everyone can use, that has to be built by an admin in the Microsoft 365 admin center as a proper distribution group, not a personal contact list. This trips up more people than any of the actual click-path steps.
How to Create an Email Group in Classic Outlook (Windows)
Classic Outlook is the version with the ribbon and the File menu - most desktop installs still run it as of mid-2026, though Microsoft has started shifting accounts to new Outlook.
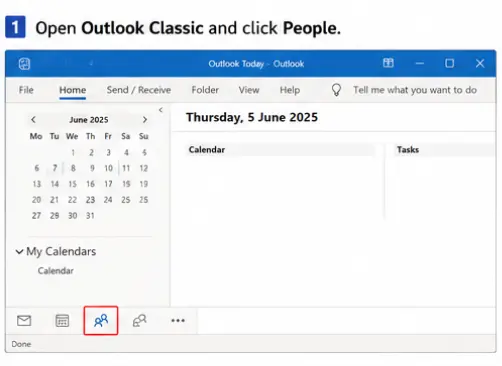
Open Outlook and click the People icon in the bottom-left navigation pane.
1. On the Home tab, click New Contact Group.
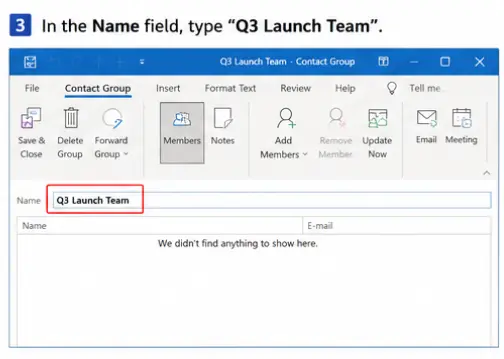
2. In the Name field, type something specific — "Q3 Launch Team" beats "Group1" the moment you have more than one list.

3. Click Add Members. You'll get three source options:
- From Outlook Contacts — pull from people already saved in your contacts
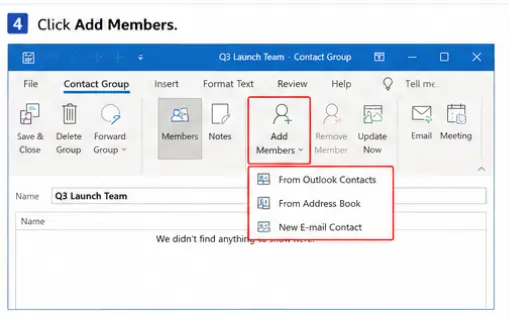
- From Address Book — search your organization's Global Address List (only relevant on a work/school account)

- New E-mail Contact — type someone's address directly, even if they're not saved anywhere yet

4. Hold Ctrl to multi-select several people at once instead of adding them one by one.
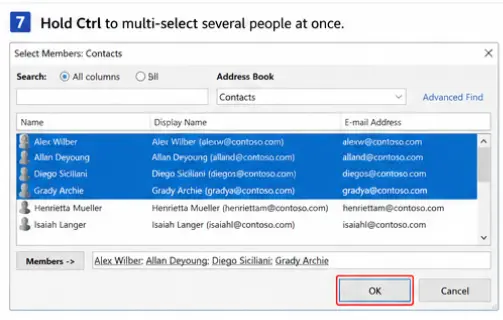
5. Click OK, then Save & Close.
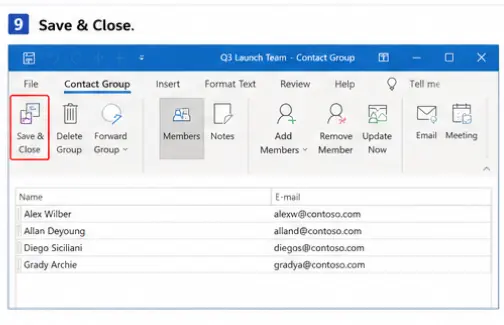
Your group now lives in your Contacts folder and shows up as a suggestion the moment you start typing its name in the To field.
How to Create One in New Outlook or Outlook on the Web
<cite index="6-1">Microsoft has been migrating Microsoft 365 users to the new Outlook desktop app since April 2026, and it shares the same contact system as Outlook on the web</cite> — so these steps work identically whether you're at outlook.office.com or in the new desktop client.
- Click the People icon in the left sidebar.
- Click the small dropdown arrow next to New contact on the toolbar.
- Select New contact list.
- Name the list.
- In the Add members field, start typing a name or email — Outlook will suggest matches from both your personal contacts and your organization's directory.
- Click Create.
Because new Outlook and Outlook on the web pull from the same data store, <cite index="6-1">a list built in one automatically shows up in the other</cite> — no extra syncing step needed.
There's also a faster route if you already have the people saved individually: open a contact's card in People, right-click it (or use the ribbon), choose Add to list, then New contact list. Handy if you're building a group from people you're already scrolling past.
How to Create One in Outlook for Mac
Mac follows the new-Outlook naming, not the classic Windows one:
- Open People.
- Go to Home > New Contact List.
- Name the list and add members with the + button.
- Click Save & Close.
Sending Email to Your Group
Once the list exists, using it is the same across every version:
- Click New Email.
- In the To field, start typing the group's name.
- Select it from the suggestions — Outlook expands it into every member's address automatically.
- Write and send as normal.
A tip that saves real embarrassment: if you're sending to a large or informal group — a club roster, a newsletter list, old clients — put the group in Bcc instead of To. Recipients won't see each other's addresses, and you avoid the classic "reply-all storm" where 40 people accidentally hit reply to the whole list. I only use To for small, working groups (a project team of 4–6) where everyone already knows each other and reply-all is actually useful.
Common Problems (and Why They Happen)
"I sent my colleague the group, but it's empty on their end." This isn't a bug — it's by design. Contact lists and contact groups are personal objects. Forwarding a contact group via email exports the member list as a static snapshot at that moment; it doesn't create a live, synced group on the recipient's machine, and any edits you make later won't reach their copy.
"The group name won't autocomplete when I type it." Usually one of two things: you're typing in a different Outlook profile/account than the one the group was saved in, or (in classic Outlook) the group was saved to a contacts folder that isn't set as your default Outlook Address Book. Check File > Account Settings > Address Books to confirm your Contacts folder is included.
"I need this for the whole department, not just me." Stop building a personal list and ask your Microsoft 365 admin for a proper distribution group or shared mailbox. Personal contact lists cap out as a convenience feature for one person's inbox — they were never meant to be an org communication tool, and they can't enforce membership rules, approval workflows, or moderation the way an admin-managed group can.
"Outlook won't let me add any more members — I'm not even at 200 yet." This is a real, hard limit most people never hear about until they hit it. A personal contact group in classic Outlook is capped by property store size rather than a simple headcount — roughly 8–16 KB per list — which typically works out to somewhere between 50 and 120 contacts, depending on how long the names and email addresses are. Add job titles, phone numbers, or notes to each contact and that ceiling drops fast. If you're bumping into this, it's another sign you've outgrown a personal list and need an admin-managed distribution group instead, which scales to tens of thousands of members without this restriction.
Naming Conventions That Actually Prevent Mistakes
If you manage more than two or three lists, a consistent naming pattern matters more than any setting in Outlook. A pattern like Team-Function ("Sales-EMEA," "Support-Tier2") or Project-Role ("Launch-Design," "Launch-Leads") makes it obvious at a glance which list you're about to email — and it's the single biggest thing that prevents the "sent the wrong announcement to the wrong 30 people" mistake, which is far more common than people admit.
Editing or Deleting a Group Later
- Classic Outlook: open People, double-click the group, use Add Members or select a member and hit Remove Member, then Save & Close.
- New Outlook / web: open People, select All contact lists, right-click the list (or use the ribbon) and choose Edit to rename it or adjust members, or Delete to remove the list entirely. Deleting a list only removes the grouping — the individual contacts stay in your Contacts folder untouched.
Quick Answer Recap
Classic Outlook (Windows) — Menu path: People > Home > New Contact Group. It's called: Contact Group.
New Outlook — Menu path: People > New contact (dropdown) > New contact list. It's called: Contact List.
Outlook on the Web — Menu path: People > New contact (dropdown) > New contact list. It's called: Contact List.
Outlook for Mac — Menu path: People > Home > New Contact List. It's called: Contact List.
Whichever version you're on, the underlying idea is identical: save a group of addresses under one name once, then reuse that name in the To or Bcc field forever. The version-specific naming is the only real snag — once you know "contact group" and "contact list" mean the same thing, the rest is muscle memory.
Related Articles
How to Recall an Email in Outlook (And What Actually Works When It Fails)
Once your contact group is set up, it's only a matter of time before you fire off a message to the whole list too fast. This guide covers what recall actually does, when it works, and what to do when it doesn't.
Step-by-Step Fix for Outlook "Cannot Start Microsoft Outlook" Error
If Outlook won't open at all, you won't be able to reach People or build any contact list in the first place. Start here if the app itself is the problem.
Troubleshoot Outlook Email Delivery Delays – Step by Step
A contact group is only useful if the messages you send to it actually arrive on time. This guide walks through the common causes of delayed delivery in Outlook.
Troubleshoot Outlook Not Sending Emails in Windows 10/11
If a message to your new group is stuck in the Outbox instead of going out, this is the fix for messages that won't send at all.
Step-by-Step Fix for Outlook Not Receiving Emails in Office 365
Sent to your group but a teammate says nothing arrived? This one covers the Office 365-side causes of missing mail, separate from the sending issues above.
How to Fix Outlook Running Slow? – Tips and Tricks
Large contact lists and a bloated address book can be part of what's dragging Outlook down. Worth a look if performance has been an issue alongside your group management.
 Verified Expert